Faculty of Electrical Engineering and Computing
Department for Electronic Systems and Signal
Processing
Laboratory for
Systems and Signals
Controlling RC Car
Over The Internet
student team:
Nikola Bradac
Jurica Grcic
Matija Velcl
1.Aim of the project
The aim of the
project is to teach the children implementing IT technologies, and to have fun
in the end of the project.
Today children play
with computers and high tech toys so it is very difficult to interest children
into learning something new. But what if kids could create there own hi-tech
toy, and learn something new in the process. That is what this project is all
about. In the end of the project children will have a very cool toy – a radio
controlled car that they can drive over the Internet !
That means that they can control the car, and see the picture from the car,
from anywhere in the world. In the process children will learn how to setup a
web server, how to control some other device with a parallel port of a computer
and how to stream a video to the internet.
2. Users and ways of
using it
We
connect, on the PC that runs server, car’s controller to the parallel port and
web cam that is filming RC car. Software application for controlling car must
also be on this PC. User can be on this server PC or he can connect to this
server via Internet.
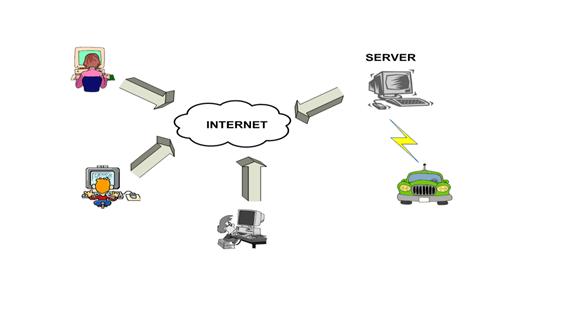
Picture
2.1. Controlling the RC car over the Internet
When
user opens this web page he will be able to control RC car by pressing keys UP,
DOWN, LEFT, RIGHT on his keyboard and he will see the picture from the web cam.
To watch a video on his web page, user has to install plug-in, Windows Media
Player, for his web browser.
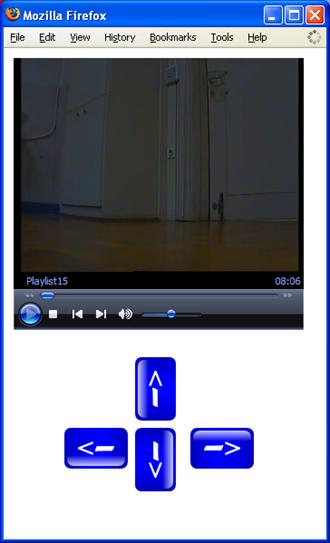
Picture 2.2.
User interface for controlling and video supervision
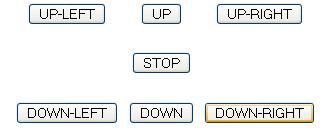
There are two web pages for controlling the RC
car. On the first web page user interacts by pressing keys on keyboard and on
the second page by moving mouse pointer over black dots or sign STOP on the
picture.
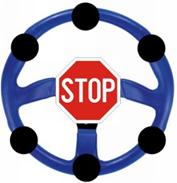
Picture 2.3.
User interface for controlling the RC car with mouse or keyboard
3.
Realizations
3.1.
Hardware
3.1.1.
Modifying car’s controller
If
you want to control your RC car via parallel port on the computer, you have to
modify the car’s controller. In this specific case, when you press button on
the controller to move the car, you connect the controlling wire to the ground
and close the electrical circuit which activates moving command. So you need to
build four electrical switches, one for every controlling wire. These switches
will connect the explicit controlling wire to ground, depending on the
instruction you have send through parallel port.
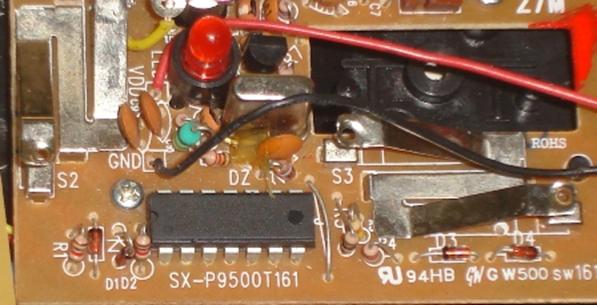
Picture 3.1.
Car's controller
Switches we used were built from transistors and a few
resistors. When you activate output pin on parallel port, you set output
voltage from zero, low state, to 5 volts, high state. High state voltage makes transistor
conduct and it connects controlling wire to low state, ground.
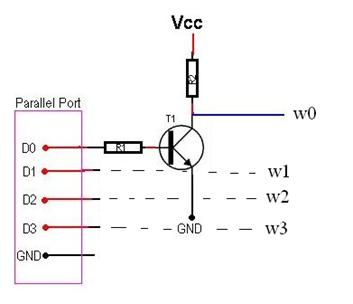
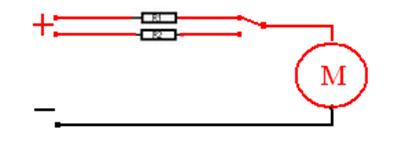
Picture 3.2.
Schematic for electrical switch
In the picture 3.2. you can see the schematics
for electrical switch, used in this project. Transistor T1 is BC547, resistor
R1 is 4,7kOhm, resistor R2 is 10kOhm. Pins D0, D1, D2, D3
are connected to data output pins, and GND is connected to GND pin on parallel
port. You need to build four of those switches, one for each data output pin.
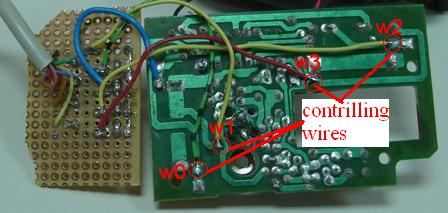
Picture 3.3.
Connecting controlling wires
3.1.2
Connecting car’s controller and parallel port
To
connect controller and parallel port you need to have DB-25 male connector and
you need to solder wires to connect output data pins with D0, D1, D2, D3 on electrical switch.

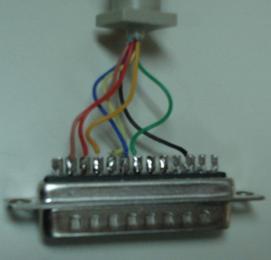
Picture 3.4.
Controlling pins on DB-25 connector
3.1.3
Reducing speed of RC car
RC
car that we used was quite fast and it was hard to precisely control the car.
To reduce the car’s speed, we have sized down the power of car’s electrical
motor with a small resistor. The resistor you need to connect may vary
between 1 and 10 Ohm, depending on the speed you want. We have also built a
mechanical switch that can select between slow and fast speed by connecting
motor via 2 Ohm or via 5 Ohm resistor.
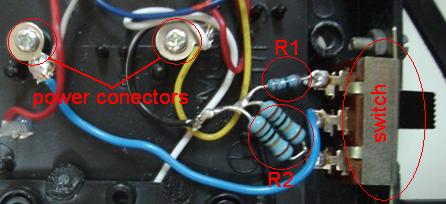
Picture 3.5.
Reducing car’s power
3.2
Software
3.2.1.
Sending data on parallel port
Windows
XP doesn’t support direct control over parallel port, so, first, you need to
copy driver for parallel port, inpout32.dll, to ”C:\windows\sistem32\”.
This driver can be imported as a library in your program and now you can use
instructions for sending data to parallel port that are embedded in this
library. You will also need a parallel port address. In most cases parallel
port address is 0x378, but to be sure, you can check port address in Windows
device manager.
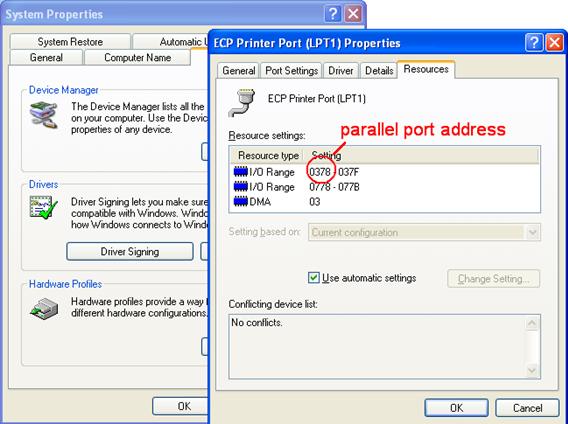
Picture 3.6.
Parallel port address
Program that we have created reads two input
parameters, parallel port address and data, that will be send
to parallel port. Which data output pin on parallel port we want to activate,
set to high state, we control with data that we send to port. This controlling
data is number from 0 to 255. When we convert this number into binary, we get
eight bit instruction and the bit that is set to one makes that pin number to
active state.
3.2.2.
Controlling parallel port over the Internet
We
can also enable users, which are connected to the Internet, to control our RC
car. We have built a simple web page that executes our program and controls RC
car. This web page must be run on server that allows PHP and server side
instructions, or you can run server on your PC. We have used XAMPP, that’s
version of Apache web server, to run our server.
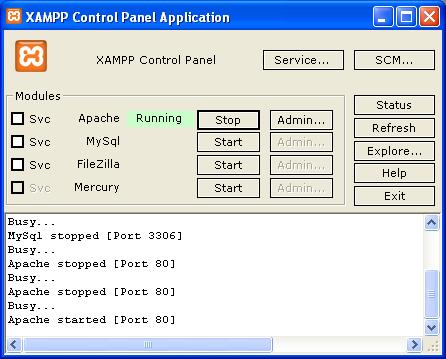
Picture 3.7.
XAMPP control panel
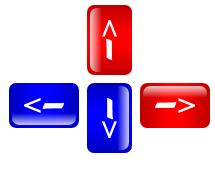
To execute program for controlling parallel port or
any other program we used PHP function “exec()”. For
basic user interface we build in HTML buttons that call executing function. For
better and simpler user interface we created another web page using JavaScript, that enables us to control RC car with keyboard.

Picture 3.8.
User interface created in HTML and JavaScript
3.2.3.
Video streaming
If we
enabled users over the Internet to control our RC car, we have to enable them
to see what they are controlling. We used a simple web cam and a video streaming
server to stream video on our web page. For streaming we use program called VLC.
It can stream various audio and video files and it also can stream video from
external capturing devices, like web cams or TV cards. In next few pictures you
can see how you can set up this streaming server to stream video from web cam.
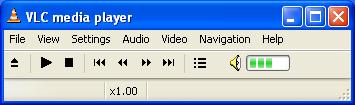
Picture 3.9.
VLC interface
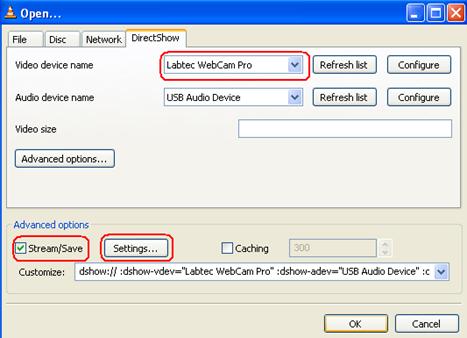
Picture 3.10. Opening capture device
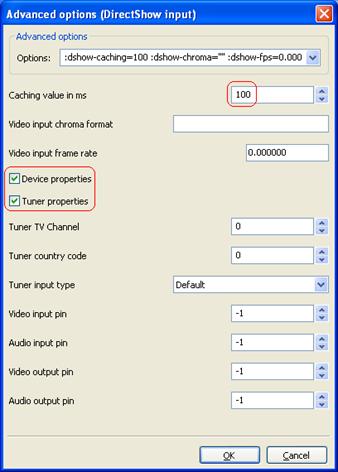
Picture 3.11. Capturing options
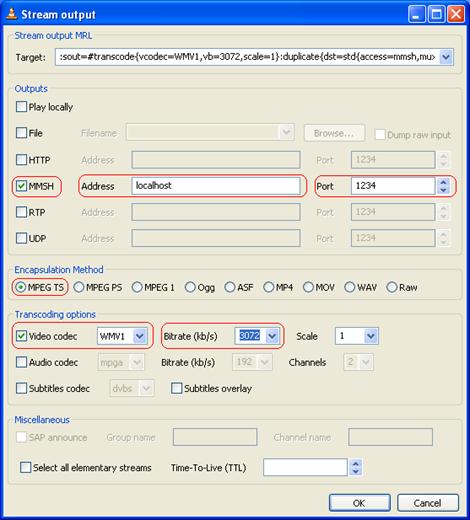
Picture 3.12. Streaming output properties
To play this video on our web page we embedded ActiveX
controls for Windows Media Player. When you open you web browser it will
automatically launch embedded player, if not you have to install Media Player
plug-in.
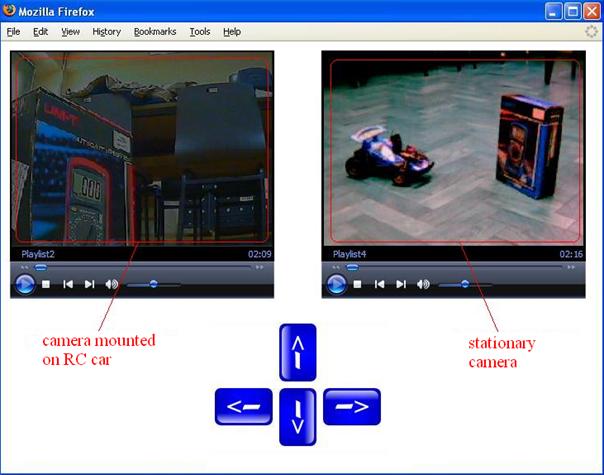
Picture 3.13. Web page with embedded Windows Media Player
4. Further
development
This
project can be modified to control other electrical devices. Parallel port has
eight output data pins, so we can control simultaneously eight devices. With
the knowledge gained on this project children may use their imagination to
create other similar projects, for example controlling toys or Lego
robots.